05. Camera settings
In order to make your camera working in perfect harmony with you software, you will have to do some settings that will never change.
For All Canon DSLR Cameras, set:
1. "Auto power off" to Off or Disable
2. "Auto rotate" to Off or Disable
3. Move camera dial to M for Manual Mode
4. Make sure your Camera is in Picture Mode
5. Scroll further to see if your camera requires additional settings
____________________________________________________________________________________
For Canon EOS 650D, 700D and 750D cameras:
1. In the 4th Camera options setting menu, select “Continuous AF” and select “Disable“
____________________________________________________________________________________
For Canon EOS 800D, 80D and 90D cameras:
1. Turn On Live View. To do so, activate the Video Mode (change the button to the video camera icon):
2. Click the Menu button
3. Find the Setting “AF Method” and set it as “Live 1-point AF”
____________________________________________________________________________________
For the Canon EOS R camera:
1. Locate "AF Method" and select "1-Point AF"
2. Disable the "Continuous AF"
3. Select "AF Operation" and choose "One Shot AF"
____________________________________________________________________________________
For Canon EOS R5 and R6 cameras:
1. Set your camera to "Video Mode", then select the "Menu"
2. Set your video mode to "Manual"
____________________________________________________________________________________
For Canon EOS M6 Mark II and M50 Mark II cameras:
1. Switch "AF Method" to " 1-point AF"
2. Disable the "Continuous Af"
3. Click on the "IS Setting" and turn the "IS Mode" to Off
4. Select "AF Operation" and choose "One Shot AF"
____________________________________________________________________________________
For the Canon EOS 5D Mark II camera:
1. Ensure the camera is disconnected from the computer
2. Press the “Menu” button and go to the 6th tab (2nd tools menu), select and enter the “Live View/Movie func. set.”
3. Select and enter “Stills only” or “Stills+movie'
4. Select “Exposure simulation“ and click on "SET"
____________________________________________________________________________________
For the Canon EOS 5D Mark III camera:
1. Click on the "Menu" button. Go to the "Tools" (yellow setting) and select "Record func+card/folder sel"
2. Ensure camera "Record func." is set to "Standard"
____________________________________________________________________________________
For the Canon EOS 5D Mark IV:
1. Select the "Menu" button. Find the “AF Method” and select to “FlexiZoneAF□”
____________________________________________________________________________________
For Canon Rebel XT/350D, 20D and EOS 5D cameras:
1. Go to the second "Tools menu" and set "Communication" to "PC Connection"
____________________________________________________________________________________
For Canon EOS 40D, 50D and 60D cameras:
1. Press the “Menu” button. Find and select the “Live View/Movie func. set.”
2. Select and enter “Stills only” or “Stills+movie“
3. “Exposure simulation" to "SET"
For the Canon EOS 40D:
1. Select an enter "C.Fn IV: Operation/Others". In this menu select "C.Fn. IV-7 Live View Exposure Simulation" and set "-1: Enable (Simulates Exposure)"
For the Canon EOS 60D:
1. Set the "Live View shoot" to "Enable"
____________________________________________________________________________________
For the Canon EOS 70D camera:
1. Find the "Driving mode" and select "Single shooting"
____________________________________________________________________________________
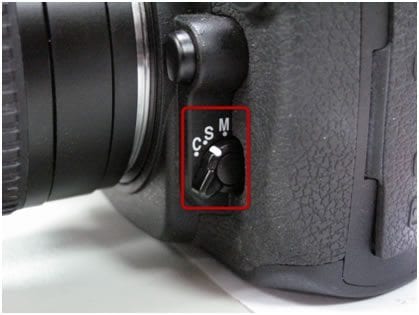
For all Nikon DSLR cameras:
1. Turn circle point to the dot, NOT to the “L”
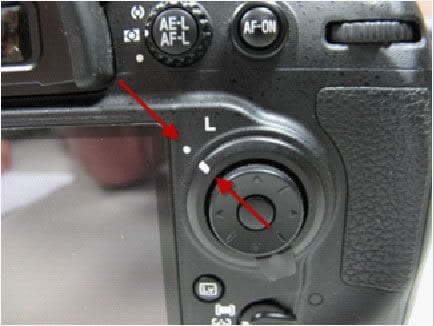
2. Change Release Mode to “S” (Single frame)
____________________________________________________________________________________
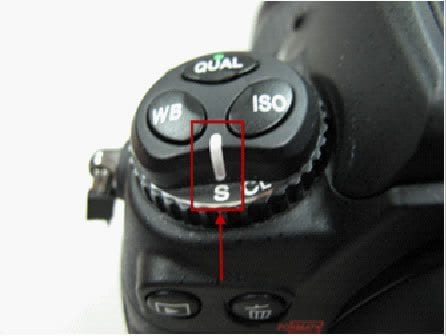
For Nikon D3, D300, D300s, D700, D750 and D7000 cameras:
1. Change Release Mode to “S” (Single frame)
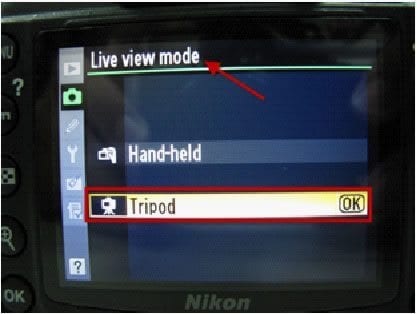
2. Click on the "Menu" button and under the "SHOOTING Menu", select the "Live view mode"

3. On the "Live view mode" select “Tripod”
____________________________________________________________________________________
For the Nikon D850 camera:
1. Click on the "Menu" button and find the the "Silent Live View". Then, set it to "Mode 1"
Related Articles
05. Can a Canon and a Nikon camera be used at the same time?
Here is a common question:I have a Canon and a Nikon camera. Can I use the Nikon camera for top shots and the Canon camera for side shots? Answer: They can work simultaneously on Windows, but not on Mac. The user has to choose a camera brand on Mac ...06. The LiveView feature doesn't work - Canon and Nikon
The LiveView feature provides to the user the possibility to preview the changes on his workspace when he's setting lights intensity or camera settings. If this feature doesn't work, don't worry! It means that you didn't set the Exposure Simulation ...09. "Camera not found"
Problem: Customer's camera was not found. In this case the customer was using a Canon T6i (Canon 750D). The camera’s Wi-Fi feature was turned On, which turned Off all communication with the computer by USB to the camera. Therefore, when the camera ...18. Mac OS Catalina X Canon X PackshotCreator
Published on 20.01.20 Dear PackshotCreator Users, On December 12th 2019, Canon announced that “With the release of macOS 10.15.2 (Catalina) we have confirmed a USB connection issue with the EDSDK in which the EDSDK is unable to detect a connected ...14. Focus Rectangle does not appear
Problem: Cannot Zoom in the Preview – zoom contents of the focus ring – the Focus Rectangle does not appear. (Customer is using a 5D mark III with a 24-70mm lens) on Windows 10). Cause of problem: Wrong Camera Setting. The camera defaults to the ...